Friday, November 22, 2019

How to Proxy SSL IMAP/POP3/SMTP using HAProxy and Dovecot+Postfix

This post shows how to configure a mail proxy server to connect clients in an intranet to an external mail server. I will use SSL offloading method since the mail proxy server is owned by the same company that's running the main mail server therefore decrypting the data on the proxy server and encrypting them again is not a security concern.

HAProxy - Dovecot configuration

I use HAProxy on the VPS Proxy server to proxy SSL IMAP/POP3/SMTP protocols to the main mail server. The main server is using Dovecot/Postfix to run email service.

First, install HAProxy on the VPS proxy server, generate a valid SSL for its hostname and configure haproxy to proxy IMAP/POP3/SMTP SSL ports to the main mail server :

listen main-pop3
  bind :995 ssl crt /etc/letsencrypt/live/HOSTNAME/fullchainkey.pem no-sslv3
  mode tcp
  balance first
  stick store-request src
  stick-table type ip size 200k expire 15m
  server s1 MAINHOST.FQDN:10110 send-proxy-v2 ssl verify required ca-file ca-certificates.crt

listen main-imap
  bind :993 ssl crt /etc/letsencrypt/live/HOSTNAME/fullchainkey.pem no-sslv3
  mode tcp
  balance first
  stick store-request src
  stick-table type ip size 200k expire 15m
  server s1 MAINHOST.FQDN:10143 send-proxy-v2 ssl verify required ca-file ca-certificates.crt

listen main-smtp
  bind :465 ssl crt /etc/letsencrypt/live/HOSTNAME/fullchainkey.pem no-sslv3
  mode tcp
  stick store-request src
  stick-table type ip size 200k expire 15m
  server s1 MAINHOST.FQDN:10465 send-proxy-v2 ssl verify required ca-file ca-certificates.crt

/etc/letsencrypt/live/HOSTNAME/fullchainkey.pem is a valid certificate generated for the VPS Proxy hostname and it should contain both private key and certificate.

MAINHOST.FQDN is the full hostname of the main mail server, and haproxy is connecting to it securely (send-proxy-v2 ssl) and verifying its SSL against ca-certificates.crt file.

Now, on the main mail server side, we need to configure dovecot to listed on the custom ports for haproxy (10110, 10143, 10465) . Dovecot added support for haproxy since version 2.2.19. We open separate ports for haproxy and enable haproxy in the listeners which will allow dovecot to get the correct data of clients from haproxy server. Add the following code to /etc/dovecot/conf.d/haproxy.conf on the main mail server:

haproxy_trusted_networks = VPS.PROXY.IP/32
service pop3-login {
   inet_listener pop3_haproxy {
     port = 10110
     haproxy = yes
     ssl = yes
   }
}
service imap-login {
  inet_listener imap_haproxy {
    port = 10143
    haproxy = yes
    ssl = yes
  }
}
service submission-login {
  inet_listener submission {
    port = 10465
    haproxy = yes
    ssl = yes
  }
}
submission_relay_host = localhost
submission_relay_port = 25
submission_relay_trusted = yes
submission_client_workarounds = whitespace-before-path

Note that we are not sending queries from haproxy directly to postfix, instead we use submission listener of dovecot to authenticate clients in a similar way as imap/pop3 protocols. To enable submission service, you need to add submission in the list of protocols in dovecot.conf file : 

protocols = imap pop3 submission

Dovecot receives emails on port 10465 from haproxy, authenticate clients using its configured settings, and then send them to submission_relay_host which is postfix in this case. Postfix is running on the same machine as dovecot on port 25. We need to configure postfix to accept XCLIENT data that dovecot sends to it. (Xclient contains data of client that haproxy sends to dovecot). We set dovecot to send the real data of client to postfix by setting submission_relay_trusted = yes in its config file. We also need to set postfix to accept this data from dovecot by adding the following line to /etc/postfix/main.cf file : 

smtpd_authorized_xclient_hosts = 127.0.0.1

Now, clients in a restricted network can connect securely to the VPS proxy server. This Proxy server receives data from clients and sends them securely to the main mail server.

The line submission_client_workarounds = whitespace-before-path is required in configuration of dovecot submission for Microsoft outlook to work properly. I was getting the following error in Microsoft outlook 2016 before setting this variable :

Sending reported error (0x800CCC78): Cannot send the message. Verify the e-mail address in your account properties. The server responded: 501 5.5.4 Invalid FROM: Unexpected whitespace before path

Thursday, November 21, 2019

Postfix smtp_fallback_relay and HAProxy smtp relay in action

It's possible to use HAProxy to add a SMTP relay for a domain mail service which can be used to add a secondary mx record for a domain name to enable its clients in a restricted network reach the mail server :
Clients in a restricted network -> HA Proxy VPS (second priority mx record) -> Main server
HAProxy - Postfix configuration

You'll need to get a VPS with internet access in the restricted network and install HAProxy on it. Then configure HAProxy on the vps to forward SMTP port 25 to the main server : 

frontend ft_smtp
  bind 0.0.0.0:25
  mode tcp
  timeout client 1m
  log global
  option tcplog
  default_backend bk_postfix

backend bk_postfix
  mode tcp
  log global
  option tcplog
  timeout server 1m
  timeout connect 5s
  server postfix YOUR_MAIN_IP_ADDRESS:2525 send-proxy

Now on the postfix of the main server edit the main.cf and set the upstream proxy for postscreen to haproxy: 

postscreen_upstream_proxy_protocol = haproxy

and finally enable smtpd and postscreen in master.cf :

2525    inet  n       -       n       -       1       postscreen
smtpd     pass  -       -       n       -       -       smtpd


One can add a new mx record with a lower priority to the domain with the IP address of the HAProxy server so that clients that aren't able to reach the main mail server can access it through the HAProxy server.

But how can these clients receive emails from the main mail server? Postfix on the main server can't reach these clients directly, so one can use smtp_fallback_relay feature in postfix to reach them through the same VPS that's running HAProxy.

To do so add the IP address of the vps that's running HAProxy as a SMTP Fallback relay to the main.cf file of the main mail server : 

fallback_relay = [YOUR_VPS_FQDN]:5870

You'll need to also add the IP address of your VPS to the SPF records of the main domain.

Now on the vps server, install postfix and set it to run as a relay. Add the IP address of the main mail server to mynetworks in main.cf file of the vps, to allow it to use this vps as a relay mail server. 

 Ensure that the hostname of the vps matches with the PTR record of YOUR_VPS_IP_ADDRESS and the value in /etc/mailname of the vps.

Edit the master.cf file of the postfix on the vps server and add the port you set in fallback_relay there : 

5870    inet  n       -       y       -       -       smtpd

That's it. With this configuration, clients first try to reach the main mx records and they try the second mx record if the first one was inaccessible. Also the server tries to reach mail servers directly and it tries the relay smtp server if they were unreachable. 


Saturday, July 6, 2019

[Standalone] Tunneled Wireless/LAN Connection using WireGuard


Basic Idea

Setting up a wireless / LAN router that provides tunneled traffic to clients.

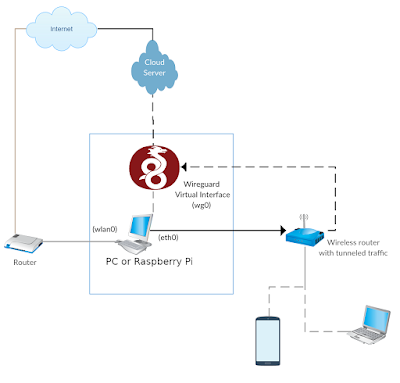
I use wireguard on my PC to encrypt my internet connection. Although it's possible to install wireguard on each device you want to have an encrypted connection, I had a spare wireless router at home and decided to run a wireless access point which provides its clients a tunneled connection out of the box.

The PC in the diagram can be replaced by a Raspberry Pi board to make the tunnel standalone. Orange Pi PC model should be enough as we only need a USB port to get internet from the main router and a LAN port to deliver the tunneled traffic to the wireless router

Tunneled Wireless/LAN Connection using WireGuard

Overview 
1- Run Wireguard on your VPS and your PC to tunnel your traffic to the vps server

2- Run DHCP Server on the PC and configure the PC to route all traffic from the wireless router to the wireguard interface 

3- Configure the wireless router to get internet from the PC using its LAN (WAN) Port

Steps

You first need to get a vps server and install wireguard on it. 
Cloud server
I used this (and this) tutorial to run and install wireguard on a centos 7 server. The config file on the server side was like this :
[Interface] 
Address = 10.10.0.1/24 
ListenPort = TUNNEL_PORT 
PrivateKey = SERVER_PRIVATE_KEY 
PostUp = iptables -A FORWARD -i %i -j ACCEPT; iptables -t nat -A POSTROUTING -o eth0 -j MASQUERADE 
PostDown = iptables -D FORWARD -i %i -j ACCEPT; iptables -t nat -D POSTROUTING -o eth0 -j MASQUERADE 
#PC 
[Peer] 
PublicKey = PC_PUBLIC_KEY 
AllowedIPs = 10.10.0.2/32
where eth0 is your external network interface on the vps server.
PC 
On the PC, we first need to install wireguard and configure it to connect to the server:
[Interface] 
PrivateKey = PC_PRIVATE_KEY 
Address = 10.10.0.2/24 
DNS = 8.8.8.8, 8.8.4.4 
Table = off 
PostUp = iptables -t nat -A POSTROUTING -o wg0 -j MASQUERADE; ip rule add from 10.1.0.0/24 table INET2; ip route add default via 10.10.0.1 dev wg0 table INET2; ip route flush cache 
PreDown = iptables -t nat -D POSTROUTING -o wg0 -j MASQUERADE; ip rule del from 10.1.0.0/24 table INET2; ip route del default via 10.10.0.1 dev wg0 table INET2; ip route flush cache
[Peer]
PublicKey = SERVER_PUBLIC_KEY
AllowedIPs = 0.0.0.0/0
Endpoint = CLOUD_SERVER_IP:TUNNEL_PORT
where 10.1.0.0/24 is the network address of the lan port connected to the wireless router, and 10.10.0.1 is the wg0 gateway IP address on the vps server. We need to create a new route table to configure the PC to route all traffics from the wireless router to the wireguard interface. I have used the required commands in the PostUp and PostDown arguments above, so it's only required to run the following command on the PC once to create the new route table : 
echo 200 INET2 >> /etc/iproute2/rt_tables
In addition, packet forwarding needs to be enabled on the PC.
Now, we need to setup the PC to act as a DHCP server for our wireless router. I used eth0 lan port to connect it to the router, so first I assign a static IP address to this interface by adding these lines in the /etc/network/interfaces:
auto eth0 
iface eth0 inet static  
address 10.1.0.1  
netmask 255.255.255.0 
post-up /sbin/ifconfig eth0 mtu 1420 
dns-nameservers 8.8.4.4 
dns-nameservers 8.8.8.8

and also add these to /etc/dhcpcd.conf (required if you are using raspberry pi):

interface eth0

static ip_address=10.1.0.1/24

static domain_name_servers=8.8.4.4 8.8.8.8

static interface_mtu=1420 

# if you have another network card eth1 and want to make it the default route

interface eth1

metric 200;

 then install a dhcp server on the PC node. 


Add eth0 to INTERFACESv4 variable in /etc/default/isc-dhcp-server file


Use the following config file /etc/dhcp/dhcpd.conf :

option domain-name-servers 8.8.8.8, 8.8.4.4;
default-lease-time 600;
max-lease-time 7200;
ddns-update-style none;
authoritative;
subnet 10.1.0.0 netmask 255.255.255.0 {
option routers 10.1.0.1;
option subnet-mask 255.255.255.0;
option broadcast-address 10.1.0.255;
option interface-mtu 1420;
range 10.1.0.10 10.1.0.20;
}

Note that we used the same 10.1.0.1 IP address and subnet masks that's consistent with the IP address used in PostUp and PostDown sections of our wireguard config file on the PC. We have also deliberately set MTU to 1420 as it is the default MTU for wireguard tunnels.


Wireless Router

The wireless router is connected to the PC via a LAN port. I used D-Link 2750U that had 4 LAN ports, and according to the modem manual, the lan port #4 was a WAN port in the router which means that the router could be set up to get internet from this LAN port and share it through wireless or other LAN ports.

To set up the D-LINK 2750U router, I created a new interface in Advanced Setup -> Wan Service and set the type to IPoE with enabled NAT. Then set the primary uplink in Advanced Setup -> 3G Connection to Ethernet.

You can use dhcp-lease-list command on the PC to ensure that the the modem has acquired a correct IP address.

Note that the default MTU of wireguard interfaces is 1420, so you need to set the MTU in your wireless router to this value otherwise you may have weird problems such as some websites working and others not


You can use this guide to do MTU discovery. This post has explained how to set the correct MTU on wireguard in details.

That's all, now any client that connects to the wireless router gets its encrypted internet from the cloud VPS server.. 

Thursday, May 30, 2019

How to Install Aegisub on Ubuntu 19.04 and 18.10


Aegisub is not available as a package in recent versions of Ubuntu. It's possible to install it from anton ppa though:


sudo add-apt-repository ppa:anton+/photo-video-apps
sudo apt-get install aegisub

Thursday, January 17, 2019

How install Xymon client on Centos 7 / Debian 9

Xymon client is available in debian repo and can be installed by apt-get install xymon-client  however on Centos 7 no package is available and one needs to compile it from source :


groupadd xymon
useradd -g xymon -m xymon

yum install gcc make fping pcre-devel openssl-devel openldap-devel rrdtool-devel libtirpc-devel -y

cd /usr/src
wget https://sourceforge.net/projects/xymon/files/Xymon/4.3.30/xymon-4.3.30.tar.gz
tar -zxf xymon-4.3.30.tar.gz
cd xymon-4.3.30
./configure --client
# Choose /usr/lib/xymon/client as the directory to install
chown -R nobody .
sudo -u nobody make
make install
cp rpm/xymon-client.init /etc/init.d/xymon-client
cp rpm/xymon-client.default /etc/default/xymon-client
# configure IP address in /etc/default/xymon-client
chmod +x /etc/init.d/xymon-client
service xymon-client start
chkconfig xymon-client on

How to export Apple Health / Google Fit training activity to TCX format

  I own a Xiaomi Smart Band 7, and recently, my Mi Fitness app stopped syncing running activities to Strava. Mi Fitness supports syncing dat...