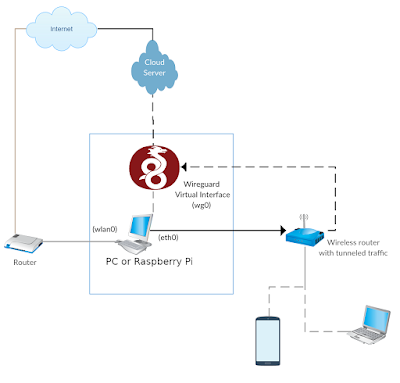
Basic Idea
Setting up a wireless / LAN router that provides tunneled traffic to clients.
The PC in the diagram can be replaced by a Raspberry Pi board to make the tunnel standalone. Orange Pi PC model should be enough as we only need a USB port to get internet from the main router and a LAN port to deliver the tunneled traffic to the wireless router
1- Run Wireguard on your VPS and your PC to tunnel your traffic to the vps server
Steps
[Interface]
Address = 10.10.0.1/24
ListenPort = TUNNEL_PORT
PrivateKey = SERVER_PRIVATE_KEY
PostUp = iptables -A FORWARD -i %i -j ACCEPT; iptables -t nat -A POSTROUTING -o eth0 -j MASQUERADE
PostDown = iptables -D FORWARD -i %i -j ACCEPT; iptables -t nat -D POSTROUTING -o eth0 -j MASQUERADE
#PC
[Peer]
PublicKey = PC_PUBLIC_KEY
AllowedIPs = 10.10.0.2/32
[Interface]
PrivateKey = PC_PRIVATE_KEY
Address = 10.10.0.2/24
DNS = 8.8.8.8, 8.8.4.4
Table = off
PostUp = iptables -t nat -A POSTROUTING -o wg0 -j MASQUERADE; ip rule add from 10.1.0.0/24 table INET2; ip route add default via 10.10.0.1 dev wg0 table INET2; ip route flush cache
PreDown = iptables -t nat -D POSTROUTING -o wg0 -j MASQUERADE; ip rule del from 10.1.0.0/24 table INET2; ip route del default via 10.10.0.1 dev wg0 table INET2; ip route flush cache
[Peer]
PublicKey = SERVER_PUBLIC_KEY
AllowedIPs = 0.0.0.0/0
Endpoint = CLOUD_SERVER_IP:TUNNEL_PORT
echo 200 INET2 >> /etc/iproute2/rt_tables
auto eth0
iface eth0 inet static
address 10.1.0.1
netmask 255.255.255.0
post-up /sbin/ifconfig eth0 mtu 1420
dns-nameservers 8.8.4.4
dns-nameservers 8.8.8.8
and also add these to /etc/dhcpcd.conf (required if you are using raspberry pi):
interface eth0
static ip_address=10.1.0.1/24
static domain_name_servers=8.8.4.4 8.8.8.8
static interface_mtu=1420
# if you have another network card eth1 and want to make it the default route
interface eth1
metric 200;
then install a dhcp server on the PC node.
option domain-name-servers 8.8.8.8, 8.8.4.4;
default-lease-time 600;
max-lease-time 7200;
ddns-update-style none;
authoritative;
subnet 10.1.0.0 netmask 255.255.255.0 {
option routers 10.1.0.1;
option subnet-mask 255.255.255.0;
option broadcast-address 10.1.0.255;
option interface-mtu 1420;
range 10.1.0.10 10.1.0.20;
}
Note that we used the same 10.1.0.1 IP address and subnet masks that's consistent with the IP address used in PostUp and PostDown sections of our wireguard config file on the PC. We have also deliberately set MTU to 1420 as it is the default MTU for wireguard tunnels.
The wireless router is connected to the PC via a LAN port. I used D-Link 2750U that had 4 LAN ports, and according to the modem manual, the lan port #4 was a WAN port in the router which means that the router could be set up to get internet from this LAN port and share it through wireless or other LAN ports.
To set up the D-LINK 2750U router, I created a new interface in Advanced Setup -> Wan Service and set the type to IPoE with enabled NAT. Then set the primary uplink in Advanced Setup -> 3G Connection to Ethernet.
You can use dhcp-lease-list command on the PC to ensure that the the modem has acquired a correct IP address.
That's all, now any client that connects to the wireless router gets its encrypted internet from the cloud VPS server..


